Thursday, 20 June 2013

Project 25, re-branded

Project 25 was a dress from a grey crinkle fabric that I had in my stash.  While looking for something to sew I kept coming across the fabric, and kept on looking for something more inspiring to sew.  I recently pulled it out of the stash and looked at it.  The reason I kept ignoring it is that it was a truly boring, cheap synthetic fabric, and I can’t imagine wanting a dress made out of it!  When I put it on the list of 52 projects I was allocating fabrics from my stash while I was away from home, so couldn’t actually see any of the fabrics.  My idea was making a plain dress then adding embroidery or embellishment to make it something a little special.  In reality, a plain grey dress is going to struggle to be in the least bit special and the nature of this fabric makes it pretty close to impossible. 

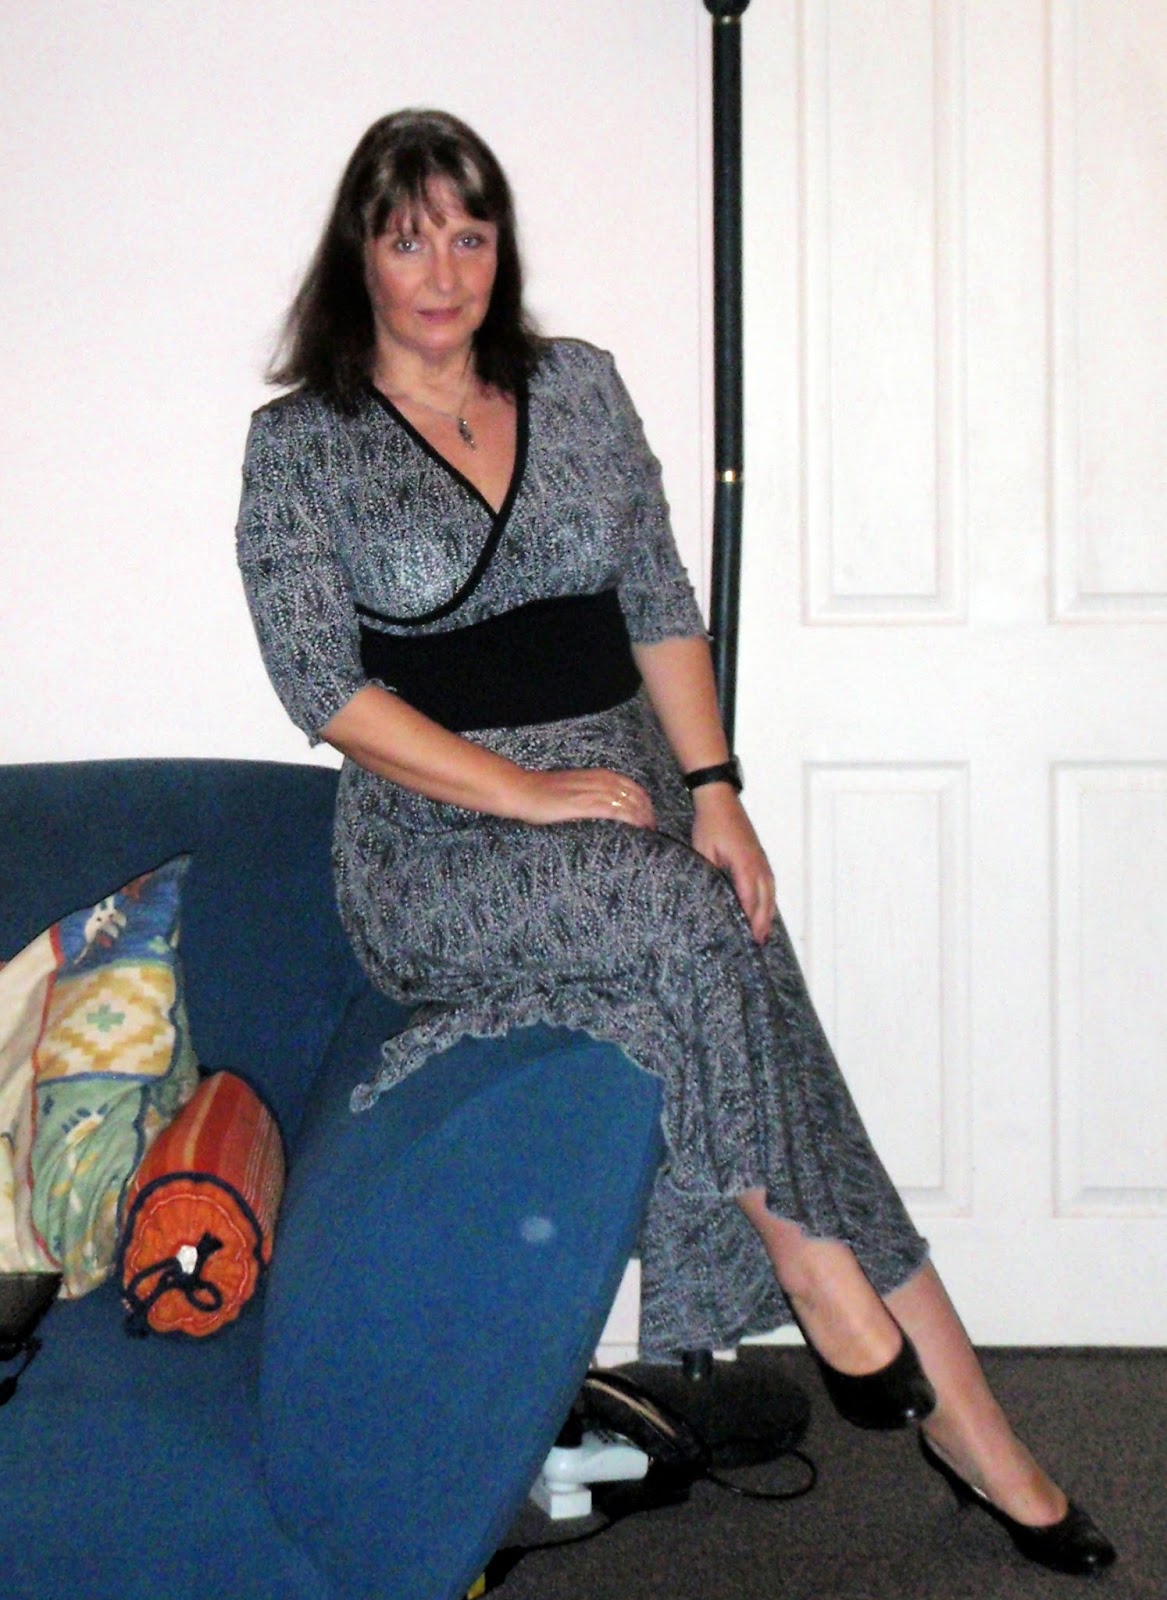
While I was in the stash I did come across another grey print that I had forgotten about; it’s a very light weight knit with a small print of black white and grey.  Again, it’s never going to be a stunner, but I can see it being a very practical dress in a shape that flatters my figure.  I attempted this style in a blue, black and white lycra a month or so ago, but I rushed the project and made a few fundamental mistakes because I was rushing it.

The plan was to use the top from a wrap-effect top from Butterick 3344,
adding a full skirt and black bands to accentuate the wrap over effect.

When I made it before I ended up with the waist too high, so I added a plain black panel at the waist.  Although it was a mistake, I decided that the black waist panel actually worked, although it was too wide last time.


 I was a little more careful about calculating the waist measurements this time, so ended up with a circle skirt with lovely movement.  It is thin enough that the vast amount of fabric hangs well without looking bulky.

It’s not a show stopping dress, but it’s super-comfy and practical (and doesn’t need ironing)as a work day dress when I really can’t be bothered matching separates.  I’ve already worn it a few times and liked it. 

Project 8 - Vogue 1352


This is a full length maxi dress that I bought when Vogue was gaving an on line sale.   The postage  to New Zealand for vogue patterns means that their sales are only worth it if we buy several patterns.  I thought that this looked like an interesting pattern, and immediately thought of project 8 on my 52 projects for 2013 – a grey and lavender strach fabric.  It’s quite sheer so I lined the skirt and the front bodice pieces with a similar fabric in grey. 

I made it up in a size 14, which is usually a bit snug round the bust, but since I was using a stretch I figured I’d get away with it.  In fact it was still rather generous round the bust and the wrap effect was sort of lost.

Apart from that it did look like the picture.  It was an easy pattern to make up.  I did the whole dress on the overlocker as soon as I'd had my lesson on how to use it properly.

Unfortunatley the only interesting thing about the design was the wrap effect at the front, so I felt it was a little sort of blah blah as a dress. Also, it’s not dreadfully flattering to a larger bust. The skirt pieces don’t really have enough flare, so the skirt kid of just hangs.


I’m not widley enthused by the dress.  I don't feel it does a great deal for me.  I do like to wear maxi dresses, especially in the summer so I will wear it, but probably won't use the pattern again.


Project 51 and my Sewlution Progress


My 52 projects were inspired by Karen (Didyou make that?) sewlution.  She challenged us all to make a commitment to a sewing related goal for 2013 by posting it on her blog. 

My sewlution was to get Jeans and their fitting sorted in 2013.

I did make an attempt at Jeans about a year ago, but wasn’t ecstatic with the fit.  I have a lovely print that I am keen to make a summer pair of jeans with, but didn’t feel that I wanted to “waste” the print until I was sure I’d be able to do it justice. 

My first step this year was a pair of red ¾ jeans.  Rather than rush back to a pattern that didn’t work last time, I started with my pant block this time.


The best thing I can say about this garment is that I have something to do the gardening in!  Standard trousers don’t adapt well to the weight of jeans, and even my embellishment didn’t lift these “jeans” at all. 


Rather than declare this an epic fail I’d like to re-brand it a learning experience!  I now know that jeans and trousers are not interchangeable and that same colour embroidery gets lost on denim.  A standard pair of pants fit at the waist and crotch, but skim, rather than hug from the hip down, while jeans tend to hug the thighs and butt much more. 


I am, however, not deterred.  I’m still not happy to use a fabric that I actually like, so I picked up a blue/grey striped denim from trade-me and returned to McCalls 5894 for another attempt.

This went slightly better.  I pre-washed this fabric several times before starting, so I could be confident that it wouldn’t shrink further.  I also top stitched the inside leg, so I could continue to adjust the outside leg seam to fit. 

Overall it’s definatley better than my last two goes.  The back feels as though it fits well, hence the dreadful butt picture.  I’ve still got a bit of gapping in the waistband, but I get that in RTW Jeans too.  I need to suss out a sway back adjustment for next time.
The front still needs a little work, but these are wearable with a top that covers the waist area.
 

Needless to say, I let the embroidery machine have a little play on these , just because I can.  Yes, those are daisies on the left leg!
This is the closest I've got as far as jeans are concerned, and I will wear them out of the house.  I still think I can improve further, but I'm probably ready to tackle project 52 now, and actually use a fabric that I don't want to muck up

Sunday, 16 June 2013

Auckland Sewing Bloggers Meet up


I’ve had a really busy time, with a lot on my mind since the Auckland Bloggers meet up, but I did remember to take my camera this time.  
Penny, Frances, Claire, Carolyn, Jason and me

The café we’d decided to meet at has a lot of small areas, and I realised that we hadn’t decided which one we going to meet up in.  I needn’t have worried.  One of the first people I saw was Claire, looking around, thinking the same as me.  Before we had to decide anything I spotted this waistcoat (with Carolyn inside it!)  With three of us standing around in a busy café we decided to find a table and take ownership, hoping the others would find us.  Once we’d claimed our space we found Penny and Frances ordering coffee.  

How Jason found us I don’t know, but he managed to appear at the table next to us and joined in as we were discussing our machines.  It’s a shame that he had to preface his opening statement with “I’m not trying to be creepy, but…”  When I thought about it afterwards it must have been pretty intimidating to try and join in to a group of girls without giving the wrong impression.  He needn’t have worried, once we got into discussing our sewing machines, fabric purchases and other crafty projects, he fitted right in with the rest of us.

The guys at the next table didn’t seem to comprehend that we didn’t really care what famous rugby types they were, we just wanted a picture of us, not them!

Carolyn’s embroidery was really inspiring, and it was great to spend a few minutes talking sewing and crafts.  Well, at least it felt like a few minutes, but it was actually a couple of hours.

Thanks Penny for organising it.

Friday, 7 June 2013

Personal Development


Not many pictures or finished objects in this post. 
A few months ago my overlocker died - L  I was faced with three choices:

a.    Go back to zigzagging the edges of all my pieces before I start sewing a project.

b.    Look for another older three thread overlocker like the one that had just died.

c.    Invest a little bit extra and buy a second hand, but newer, four thread overlocker with a few fancy functions.

The thought of going back to zigzagging was just too hard, so I approached the second hand market with either b or c in mind. 

It took a while to find one but this Babylock Protégé came into my life about two months ago.


She didn’t have instructions, but I sort of managed to figure out how to thread her up from the diagrams on the machine.  Although I’d got her working, the stitches formed a loopy finish on the edge and if I tried to use it to sew a seam if sort of stretched out and the stitches were really obvious.

I eventually found a manual on line, but still didn’t seem to really get on with her.  I carried on using the overlocker to finish and trim edges, but felt that I wasn’t really using her to her potential.  At around the same time I took a long hard look at a few of my recent projects with dissatisfaction.  There were a couple of areas that I felt that my lack of skill had let me down.

I was picking up some supplies in my local Spotlight when I noticed leaflets advertising a sewing tutor who did home visits and claimed to be able to teach any machine at a reasonable cost. 

I checked her website, and rang her up and had a chat, after which I booked for her to come to my home on a Saturday afternoon and teach me to love my overlocker and give me a hand with my button holes and zips on biased seams.

True to her word Diane obviously knows her overlockers.  Within half an hour I knew exactly what I had been doing wrong and was confidently threading and unthreading the babylock.  It was actually something soooo trivial that I wouldn’t have even thought about it, but she explained why it was mucking my tension up so badly.  She went through how to adjust the tension, and then moved on to rolled hems,

Beautiful rolled hem

flatlock stitches and special finishes with the overlocker.  We just had time at the end for her to give me a few useful pointers with my zips and button holes. 

Her minimum session is three hours for $85 and 25 per hour after that.  I found that three hours was about as much tuition as I could handle.  By the time she left I was busting to try all the fancy techniques that she had taught, as well as re-do all the garments I've overlocked the hems of in the last few months.   
If you’re in Auckland I can recommend her, not just for learning a new machine, but also for mastering a particular aspect of sewing.  She’ll even take two or three students for no extra charge.

In the meantime, I see heaps of overlocked projects on the horizon for me.
NB - I paid full price for this lesson and this post is an honest review of my experience for which I have received no reward.
Project 13


I’ve avoided this write up because I’m not really happy with this jacket and I’m not sure what went wrong.  It was one of my 52 projects, and I started it way back in February, and I thought it looked great, but we had a few months of really hot and sunny weather round that time and I totally lost enthusiasm for what was a pretty heavy-weight jacket.  Over the last few weeks the season turned dramatically, by passing autumn/fall altogether and rushing headlong into winter.  My desire for a finished jacket spurred me into action and I set about lining and finishing project 13.  If I was a superstitious person I would have missed number 13 when I was setting projects for 2013.

It should have been a no brainer.  I used a pattern that I’ve used before successfully...

... and I’m no stranger to using furnishing fabrics for jackets.

 Somehow this just didn’t turn out right.

The edges look sort of curved, and the collar won't stay flat.  No amount of pressing will improve the look.

The pockets look as though they are in the wrong position.

The button hole went really wrong...


Maybe it would look better if I tried to look happy about it?

No.

I'll probably wear it because it's not really bad, but I really feel that this has failed to live up to my expectation.  Maybe I'll try hitting it with an iron again...

Thursday, 30 May 2013

Handmade Gifts


One of my commitments for 2013 was to use some of my handmade items as gifts this year.  I suffer from an odd idea that handmade presents are somehow second best.  Last Christmas I gave my mother a jacket that I had made for her.  Her delight, combined with my sister’s envy convinced me that it was actually Ok to sew presents for people.  Far from regarding them as second best, people often feel especially pleased that I have spent the time making something for them, rather than popped out at lunch time and grabbed something from the mall. I often think it would be nice to offer friends and family something that I have made myself, but then don’t get my s**t together in time to actually have a present in time. 

This year I’m going to start a “Gift Stash”.  I will make stuff that can be given as presents without specific recipients in mind.  Hopefully when an occasion arrives I will be able to reach into the stash and pull out a handmade present.


My first offerings for the Gift Stash are kitchen items – oven mitts and gloves with matching T-Towels.  I didn’t actually make the T-towels, but I got a set of machine embroidery files from Urban Threads and stitched one of the designs on a pair of cheap T towels. The rest of the items were made from Calico and Thinsulate tm, a wading specifically sold for its insulating properties.  I designed them myself, and fully lined the glove and the main portion of the mitts with calico that was quilted with the Thinsulate tm, so the areas that are between the user and hot pans are all double layers of insulation.  I used the embroidery as the quilting.  The layers are too thick to fix into the machine hoops, so I used bulldog clips to hold the fabric and wadding on to the lower hoop.

For the gloves, I made four pieces for each glove, sewing them into two gloves, then putting one inside the other as a lining, and stitching them together at the wrist before finishing off the edge with black bias binding (made with the bias binding maker) made from black calico.

The mitts are two long oval shapes quilted with the Thinsulate tm, then two extra pieces for the ends.  I didn’t use Thinsulate tm to quilt these pieces as I don’t envisage these pieces being used to protect the user.  I then bound all the pieces together with more black calico bias binding.

I’m actually very pleased with this collection, and love the designs.  I will be quite proud to give these away.  Am I alone in feeling a bit iffy about giving home made presents?