Monday 14 April 2014

Sewing double... or triple


The Monthly Stitch challenge for April is "sewing double".  The exact interpetation of this wa left pretty open, so my first interpretation is sewing my version of a ready to wear, and sewing two garments from the same pattern:
I saw this T-shirt, over-priced, in Farmers.

I had a go and drafting a copy and came up with a more-or-less wearable muslin.

The embroidery is misplaced and not properly interfaced, but I was happy that the pattern incorporated all the features that I loved about the Farmers’ version.

I had plenty of black knit from the $1 stash, but didn’t have anything for the feature print.  I found a stretch mesh.  It has a suitable pattern, but it is see through.  I faced the first version, but I lined the next one with a lightweight black knit, which solve the see-through problem, and meant that I didn’t need facing. Other than that, I made it the same as the wearable muslin.

I think that this is reasonable copy of the Farmers’ T and I can see it working well with black or grey in a professional environment, and the muslin makes a flattering casual top.


Saturday 12 April 2014

Heather's pin dog


I’ve been watching The Great British Sewing Bee on line.  One of the season 2 competitors, Heather, uses a stuffed dog as a pin cushion.   

I was in LOVE with this pin cushion, and decided that I need one.


There are, literally, hundreds of free patterns for stuffed animal on the internet.  I wanted one as close as possible to Heather’s, and found this Dachshund, which looks pretty close in structure 

I haven’t made stuffed toys since primary school, but really, how hard could it be?   

The pattern was shown made up in a fake fur.  While this makes a more realistic dog, realistic wasn’t what I was aiming for.  Like many sewers I have piles of left over fabric which is too small for a garment, so I pulled out a tweedy fabric in pale brown and some scraps of a paisley print and an orange furnishing fabric. 

Unfortunately I underestimated the task.  I rushed in and wasn’t as careful cutting and stitching as I would have been had I been sewing a new garment, and it showed.  This finished dog was lumpy, lopsided and doesn’t stand up.


While it would function as a pin cushion, I was not happy – I wasn’t ever going to love it.  In fact, every time I looked at it I was going to be reminded of my own sloppy workmanship.  :(

Not to be deterred, I went back to the pattern and the instructions.  The instructions have clearly been written by someone who speaks English as a second language, and although they are mostly understandable I had misinterpreted the phrase “Required the seam allowance of 5-7 millimeters.”  I assume it meant that there were seam allowances of 5-7 mm included on the pattern pieces.  With hindsight I now realise that seam allowance need to be added to the pattern pieces when cutting.  Since the pattern includes several inserts to give the dog a three dimensional shape, without seam allowances the pieces didn’t fit together properly.  Forcing them to fit together had distorted the finished dog.   

Once I added seam allowances, and slowed down, the pattern fit together perfectly.  It’s not a beginner’s pattern because of the curves and inserts, not to mention the slightly jinglish instructions, but that said, it’s fiddly but not technically difficult.

Tackling it for the second time I used a chambray that I had spilt coffee on, but I was able to cut round the stained parts.  I also used some royal blue cotton and a small amount of a dolphin craft print.    

Heather’s original pin dog was made of a variety of fabrics, so I was happy with a mix of fabric.   

I used a different fabric altogether for the tail, and stuffed it with two pipe cleaners to encourage it to stand up.

For the first dog, I stuffed it with fabric pieces,( mostly spewed out of the overlocker).  Convinced that this had contributed to the lumpiness of the finished dog, I bought a half kilo of proper stuffing for this one.  I took quite a bit of time stuffing, making sure that the feet, legs and head were tightly packed before stuffing the body.
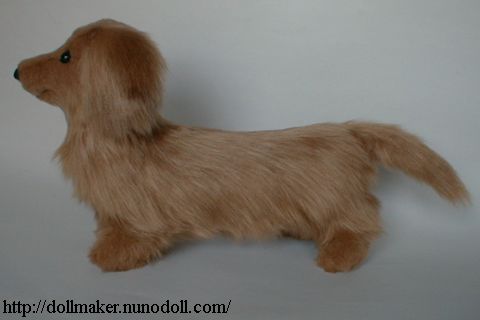
The result this time is more pleasing.  

He’s not perfect, but he’s much better.  His head is permanently cocked on one side... 

...but I’ve met real dogs like that!  He stands up most of the time, and I love the way his tail sticks up!


Thursday 10 April 2014

Copying RTW


One of the many sewing related topics that came up at the recent meet up for Auckland Sewing Bloggers was our behaviour in clothes shops.  I was glad to hear that I wasn’t the only sewer who lurks in clothes shops looking at RTW with a view to making a copy.
I was on one of these inspiration hunts when I spotted this T-Shirt in Farmers.


I quite like the use of the two fabrics, and curvy shapes.  I also wear a lot of black and white, so I could see this top featuring regularly in my wardrobe.

What I didn’t like was the price tag $69.99! WTF!  I mean, seventy bucks for a T shirt!  Even if I could afford it, I couldn’t justify that much on a single T shirt, however nice.


So, of course, I set about making my own version.

I started with a pattern from Burda magazine - January 2009.  It has the raglan sleeves not dissimilar to the RTW top, and I’ve made it several times before, so I know it fits. 


I sat down with all the essential supplies


Yes, the coffee is an essential supply!

NOTE: all these pattern pieces have NO seam allowance on them)
The sleeve on the Burda top is gathered, which I didn’t want on this version, so I pinned the excess fabric out…


And laid the piece out as flat as I could and traced it (both the original and the design was aiming for use stretch fabric, so I didn’t need to be too concerned about losing the shoulder shape)


I then made a copy of the front piece (minus the markings for an opening) and cut it into two pieces, roughly like the RTW one.   


Then I repeated the exercise on the back piece

To make the pattern piece for the facing I placed all the pieces together at the relevant seams and traced the curve, marking the centre front as a fold.  


Since this was a bit of a hack, I didn’t want to use expensive fabric to try out this new pattern, so I dived into my $1 stash and found a striped T shirting, and a plain grey one.  

I added seam allowances as I cut and added an extra 1cm on the inside of the facing curve, effectively making it slightly smaller, so I would pull towards the inside of the garment

Once I had made it up I felt that the front neckline was a little high, so I cut it a few cm down, and did the same to the centre front pattern piece.
I also added a raven with the embroidery machine because, well, because I can.

Overall I’m please with the result, and will definitely be looking for a nice black and white graphic print to make a more formal looking one for the monthly stitch Sewing Double Challenge, or I guess if I don't find the right fabric in time it could always be Sew Stretchy for May.

There are several things I will change next time:

  • I managed to get the placement of the raven a bit off, so I have a raven flying across my boob. 
  •  I still have to get better at stabilising knits for the machine embroidery.

Despite these two issues, I feel that I have a workable pattern for a “real” copy, which I probably won't embellish anyway

Saturday 5 April 2014

Just in case... the close second


MissBossy Patterns was a little indecisive about her choice, and I did make the GuyLaRoche jacket that I think that she wanted, but just in case I had been mistaken, and it was genuinely a dead heat, I thought I’d better do the Butterick dress too.   
After all, practically everyone else on the internet has made this dress.

I used a cotton print that I had got off trade-me, 

and made my own bias binding with the machine that Mum got me for Christmas.  The more I use that machine, the more I appreciate how easy it makes binding.

The pattern is really simple!  Just a few pieces which fitted together really easily.  I ditch stitched the binding down by hand, which took a while, but wasn’t really arduous; I didn’t trust my topstitching skills and it does look quite clean.


As almost everyone has commented, there is a risk of a bit of bra showing under the arms, and I’m not 100% sure about the neckline on me.  It is a really comfortable dress, but NOT cycle friendly.  The back skirt, which is tied up at the front, quickly blows back, and the front skirt, which has no centre back seam to secure it, works its way forward. Unchecked there would be vast gaps with no dress at all!

I discovered this when I decided to cycle into town, wearing this dress, to meet with the Auckland sewers, organised by Penny (Welcome back Penny).   

It was great to meet up with other sewers, and a quick coffee soon spread out to three hours.  We’re all jealous of the Wellington group and their collective photo shoots, so hopefully we can do something similar up here soon.